My Fax Menu
Use the fax dialog to send faxes. The interface is the same – if a fax server or the built-in fax card is used. You can save all settings (including the fax number) as a workflow for quick recall.
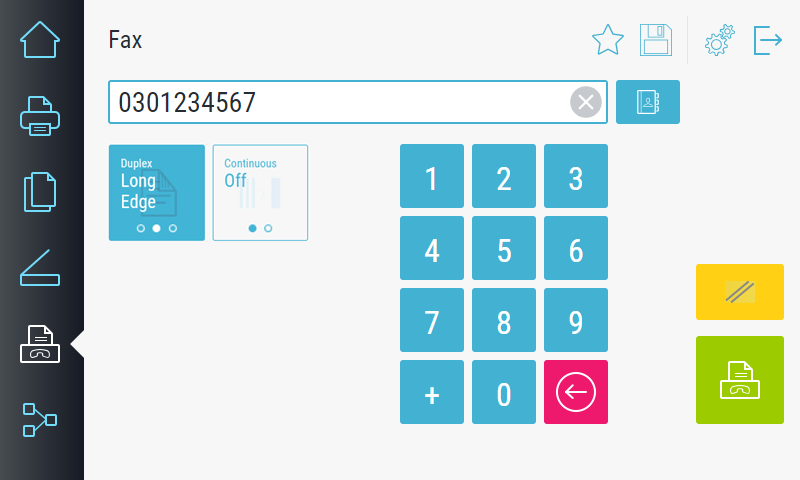
Enter the fax number to which the scan is to be sent using the numeric keys, or select a number from the address book  (ask your administrator if, for example, a number for obtaining an outside line needs to be used).
- Off: Scan is one-sided.
- Long Side: The scan is double-sided, the sheet is turned over on the long side (portrait format).
- Short Side: The scan is double-sided, the sheet is turned over on the short side (landscape format).
- Book Left: A book is scanned when it is opened on the platen glass; the left side is printed on the front side, and the right side is printed on the back side.
- Book Right: A book is scanned when it is opened on the platen glass; the right side is printed on the front side, and the left side is printed on the back side.
- On: After a scan from the platen glass or complete scanning of all pages in the document feeder, the device waits and asks if any further scans from the platen glass or document feeder should be made in addition to this scan. This continues until the user confirms the message with Finished.
- Off: The scan stops after a scan from the platen glass or after all pages in the document feeder are scanned.
 Mark functions as favorites by pressing the star symbol. These can be standard functions or workflows you have created yourself. They are displayed in Home screen under Favorites. If the list of favorites is longer than the screen is wide, swipe your finger horizontally over the favorites (a maximum of 20 favorites is possible). Press the star symbol again to remove the function from the favorites.
Depending on the system settings, this function might not be available.
 Use the Save button to save and edit a workflow. Workflow in this case means that all settings you have just made are saved and can be restored later with the push of a button or even executed immediately. The Save Workflow Settings dialog opens.
Depending on the system settings, this function might not be available.
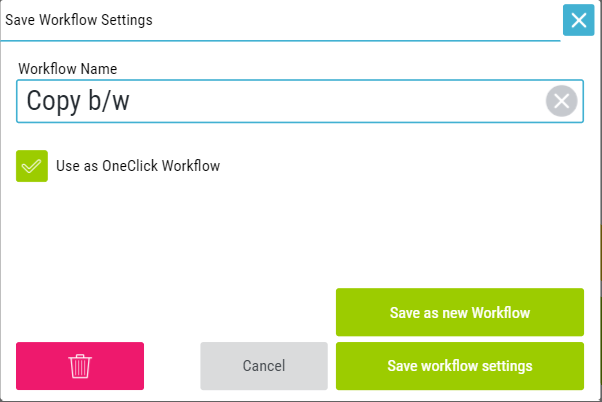
Under Workflow Name, enter a short name to appear on the button in the area My Workflows. For a workflow that already exists, you can change the name here.
Use this setting to define that a workflow will be executed directly when the button in the menu is pressed (button is displayed in green). The settings that you have previously made are used. If this indicator is not set, the dialog opens when you press the button in the menu (button is displayed in blue) and is preset with all the saved settings (you then have the option of still making changes).
Use this button to save the settings as a new workflow. In this way, you can also call up existing workflows, modify them and save them as a new workflow.
Use this button to save changed settings if you have called up an existing workflow. When creating a new workflow, this button is disabled.
 Use the Delete button to delete the workflow.
The workflow is deleted without prompting and cannot be restored.
If the original workflow is changed by the administrator, this can also affect the settings of a personal workflow (settings can be changed or omitted).
 The Settings button takes you to your personal settings, where you can set the language. With some device manufacturers, you can get there directly; with some, a menu opens which gives you to access the settings. In this menu, the status dialog of the device can also be called up using Device Status.
After logging in, the device will automatically switch to the language you have set. Depending on the system settings, you also have the option here of linking a transponder card with your user, see Card learning.
If you have the user right Use Device Function, you can close the interface of IQ4docs and go to the device interface (this is the same as the function Device Function in the Copy area, however, depending on the license of the device, the copy dialog is not always displayed).
This function is used to call up the Status device interface, in which print jobs can be viewed and paused. Technicians can also access the technician menu of the device via this menu.
If the device has to be made available with full rights for a technician, the maintenance password can be entered via this menu item, see also Unlock Device With Service Password.
If you have administrator rights to the device (see User List), you can open another dialog by pressing the Settings button for a longer time. This dialog provides you with information about the device and about the settings and versions of the Embedded Client and DeviceService. Additionally you have the following buttons:
- Save log file to USB: The IQ4docs log file is written to a USB medium plugged into the device (log_<timestamp>_<device_serial_number>.log, e.g. log_20171115_160457_W2S6801632.log). The log file can have a maximum size of 2 MB. The write operation is started immediately when the button is pressed and is also ended without a message (takes only a few seconds).
- Close application window: Closes the Embedded Client interface (displays the interface of the device).
 With some device manufacturers, pressing this icon activates the device's energy-saving mode and turns off the display. If you are currently logged in, you will be logged out by this process.
 To log out, you can press the Logout icon located in the upper right corner of each dialog. This will take you back to the default login screen (which one that is can be set under Set authentication methods).
In the case of devices for which the required device functions cannot be controlled from the software, the corresponding device-specific dialog opens instead of the IQ4docs dialog itself.